Set up MFA with the Microsoft Authenticator app to get fast, easy and secure access to our digital systems and services.
We recommend that you use the Microsoft Authenticator app set to 'receive notifications for verification' to approve sign in for you university accounts. You also need to approve location sharing for MFA to work for you.
You can authenticate without access to the internet on you mobile phone by selecting alternative method of authentication and then use verification code from mobile app. Entering the one time code will authorise your request.
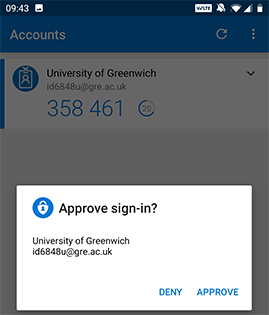
Number matching and checking which system you are approving access for helps to protect us against MFA fatigue attacks.
Number matching means you need to enter the number shown on the login page into your Microsoft Authenticator app to approve the authentication request. This means you can make sure you are approving access to the system you need.
Additional Context will give you more information about the system you’re logging into and its location. This means you can check before deciding whether to approve or deny the request. Note, the location displayed may be that of your internet provider, not your device. If the location shown is not consistent with the country you are logging in from, do not approve access and contact the IT Service Desk for advice.

Set up MFA with the Microsoft Authenticator app
Students (mobile instructions)
We recommend that you use the Microsoft Authenticator app set to 'receive notifications for verification' to approve sign in for you university accounts. You also need to approve location sharing for MFA to work for you.
Step 1
Install the Microsoft Authenticator app on your mobile device

- On your mobile device, install the Microsoft Authenticator app, available from Google Play , the Apple App Store, or the Microsoft App Store.
Step 2
Begin MFA mobile app setup
Open a browser on your device and sign in to your university account.
- You will be asked to set up your security information:
- Select Next
- On the following page, you will be prompted to set up the Microsoft Authenticator app (which you downloaded in step 1).
- Click Next to continue.
Step 3
- Remain on the Set Up Your Account page while you set up the Microsoft Authenticator App on your mobile device.
- Open the Microsoft Authenticator app on your mobile device and allow notifications, if prompted to do so..
- Tap on Add account (the + sign).
- Select Work or School Account and log in.

The Authenticator app will add your account.
Step 4
Send a notification to the app
Keeping the app open, return to the set up your account page and then select next. A notification will be sent to the Microsoft Authenticator app on your mobile device to test your account,
Step 5
Approve sign in on your mobile device
Approve the notification in the app and then select next. Your settings will be updated to use the Microsoft authenticator app by default to verify your identity when using two step verification, or for password reset.
Step 6
Add a second authentication method
On the phone setup page, choose whether you want to receive a text message or a phone call, add your phone number and then select next.
Note, if you are in the UK, when adding your phone number select United Kingdom (+44) and enter your mobile phone number without the leading zero.

A text message is sent to your phone number. Add the code provided by the text message sent to your mobile device, and then select next. Review the success notification, select next, and then select done
Step 7
MFA setup complete
- That's it!
- In future you will receive a notification to approve your sign-in.
Students (desktop instructions)
We recommend that you use the Microsoft Authenticator app set to 'receive notifications for verification' to approve sign in for you university accounts. You also need to approve location sharing for MFA to work for you.
Step 1
Install the Microsoft Authenticator app on your mobile device
- On your mobile device, install the Microsoft Authenticator app, available from Google Play , the Apple App Store, or the Microsoft App Store.
Step 2
Begin MFA mobile app setup
Open a browser on your device and sign in to your university account.
- You will be prompted to provide more information:
- Select Next
- On the following page, you will be prompted to set up the Microsoft Authenticator app (which you downloaded in step 1).
- Click Next to continue.
Step 3
- Remain on the Set Up Your Account page while you set up the Microsoft Authenticator App on your mobile device.
- Open the Microsoft Authenticator app on your mobile device and allow notifications, if prompted to do so..
- Tap on Add account (the + sign).
- Select Work or School Account
- Return to the set up your account page on your computer and then select next.
Step 4
Generate a QR code to register app
- You will be presented with a screen which includes a QR code. Scan the provided code with the Microsoft authenticator app QR Code Reader.
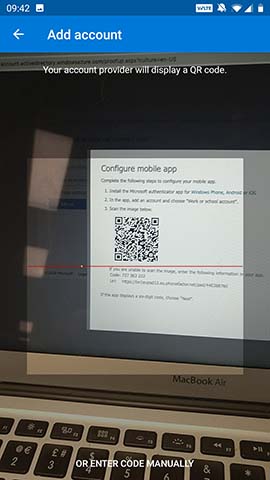
- Additional permissions
- iPhone users may have to enable the camera in Settings in order to scan.
- You may have to allow the app permissions to access the camera on your device to scan the QR square.
- If you can't use your phone camera, you'll have to manually enter the 9 digit code and the URL
The app should successfully add your account. Select next on the scan the QR code page on your computer.
Step 5
Approve the notification and confirm activation
A notification is sent to the app to test your account.
Approve the notification in the app and then select next. Your settings will be updated to use the Microsoft authenticator app by default to verify your identity when using two step verification, or for password reset.
Step 6
Add your phone number as a second authentication method
On the phone setup page, choose whether you want to receive a text message or a phone call, add your phone number and then select next.
Note, if you are in the UK, when adding your phone number select United Kingdom (+44) and enter your mobile phone number without the leading zero.
A text message is sent to your phone number. Add the code provided by the text message sent to your mobile device, and then select next. Review the success notification, select next, and then select done
Step 7
MFA setup complete
- That's it!
- In future you will receive a notification to approve your sign-in.
Staff
We recommend that you use the Microsoft Authenticator app set to 'receive notifications for verification' to approve sign in for you university accounts. You also need to approve location sharing for MFA to work for you.
Step 1
Begin MFA mobile app setup
Open a browser and sign in to your university account.
- You will be prompted to provide more information:
- Select Next

- On the following page, select 'Mobile app' as the method of contact from the drop-down
- Select 'Receive notifications for verification' to respond to a notification prompt on your device. 6 digit codes in the app can be generally ignored.
- Select 'Use verification code' to enter a 6 digit code from the app for additional authentication at each logon.

- Next, click on Set up to continue:
Step 2
Generate a QR code to register app
- You will be presented with a screen which includes a QR code: Leave the code showing on screen.

Step 3
Install the Microsoft Authenticator app on your device
- On your mobile device, install the Microsoft Authenticator app, available from Google Play , the Apple App Store, or the Microsoft App Store.
Step 4
Add your account to the app
- Open the Microsoft Authenticator app on your mobile device.
- Tap on Add account (the + sign).

- Select Work or school account.
- Use your device camera to scan the QR square that is on your computer screen
- Additional permissions
- iPhone users may have to enable the camera in Settings in order to scan.
- You may have to allow the app permissions to access the camera on your device to scan the QR square.
- If you can't use your phone camera, you'll have to manually enter the 9 digit code and the URL.
- Your account will be added automatically to the app and will display a six-digit code
Step 5
Confirm account activation on your computer
- Switch back to your computer and select Next on the 'Configure mobile app' screen to continue.
- Wait for Checking activation status to complete. Once complete, you should see the following (below):
If configuration fails, delete the account and retry the previous steps again.
- Press 'Next' on the screen to continue.
Step 6
Approve sign-in on your mobile device
- 'Step 2' on screen will ensure that the Mobile App is set up correctly.
- Go back to your mobile device
- Go to the Microsoft Authenticator app and tap Approve on the sign-in prompt:
- Back on your computer, you may then need to provide a phone number as backup in case you lose your device.
Step 7
MFA setup complete
- That's it!
- In future you will receive a notification to approve your sign-in, or enter a 6 digit code from the Authenticator app to approve your sign-in.
Changing your Preferences
- Open a browser on your device and sign in to your university account with your university credentials
- Click on the icon at the top right hand side of the screen, next to your name
- Select View Account
- Select the UPDATE INFO link on Security info tile
- Add / remove or amend telephone numbers, and change the default method of authentication
- You can add a second mobile app to reflect a new device, or if you have more than one device you wish to be prompted on
- Save any settings
- Logout
Frequently Asked Questions
If you have a question about MFA which isn't shown here, then please get in touch with the IT Service Desk.
Why does the university use MFA?
The university holds a large quantity of personal data of staff and students, as well as storing confidential research data with commercial value, which MFA helps protect. Once set up, MFA is easy to use and provides added protection against cyber-attacks which is especially important now as many of us are connecting from home.
MFA provides an additional layer of security to all our services, by requiring an additional piece of information in addition to your username and password to log in. All students, staff and affiliates must use MFA when logging on to our systems.
MFA provides a 99.9% reduction in compromised accounts and will also help to protect your own personal information. The UK Government's National Cyber Security Centre recommends that you turn on two-factor authentication (2FA) to protect your personal email and social media accounts too.
Can I opt-out of setting up MFA?
No. All students, staff and affiliates must use MFA when logging on to our systems.
MFA provides a 99.9% reduction in compromised accounts and will also help to protect your own personal information. The UK Government's National Cyber Security Centre recommends that you turn on two-factor authentication (2FA) to protect your personal email and social media accounts too.
Which services use MFA?
Most university services will require you to provide MFA. These include:
- The Portal
- Microsoft Office 365
- The Student and Staff remote desktop platform
- The Business Faculty SharePoint system
- Services which use "single sign on" to university systems, such as Box of Broadcasts.
What should I do if I lose my phone?
Please contact the IT Service Desk. You can also set up a second device in case this happens.
Will I need to verify my identity with MFA every time I sign in?
No. There is a "remember me" option so you will only need to authenticate periodically.
What if I change my phone?
If you get a new phone then you will need to change the setup of your MFA. You can do this by following the instructions in the How to change your MFA preferences video.
Don't forget to remove your data before getting rid of old devices. Before you pass your phone on or give it to a charity; remove MFA from the device, delete all your information, restore it to its factory settings and wipe any memory cards.
I've received an unexpected request to verify my authentication.
Please decline the app notification and contact the IT Service Desk who can investigate further.
What do I do if I cannot get into my account?
Please contact the IT Service Desk.
How many options should I set up for MFA?
The recommendation is at least 2, so if you forget your mobile phone, for example, you have another method set up.